Vuejs2.5开发去哪儿网
Vuejs开发去哪儿网
重要说明 -_-||
- 项目开始日期 2018-07-22,结束日期 2018-07-28
- 更换开发环境时,记得先npm install一下,再启动(可能需要安装新的依赖)
- 更换开发环境时,切换分支后,记得git pull(只pull分支节点是不够的)
- 本项目新组件都在新分支开发,master主干合并最新分支的的代码
- 开发工具SublimeText3 (调一下右下角的Tab键的设置)
- MarkDown中使用 > (>后啥也不写)来实现一个格式分割问题(类似清除浮动)--似乎还有问题(使用3个空格可以分开上下连接的问题,有时不能使用>)
- MarkDown中好像必须在列表下才可能缩进
- 使用keep-alive组件后,可能导致F5不能加载最新的代码,直接重启dev环境。keep-alive的exclude属性会导致页面中不再回调activated (),详见本文第六节第9点的说明
TODO NEXT ^_^
- 首页banner图下的图标菜单在小屏iPhone上有padding距离不正常的问题
- 首页进入城市选择页面时,页面从右向左转场动画效
链接 -_-||
2> 经验记录
效果演示
https://jiangjiesheng.gitee.io/qu-na-er

开发笔记
一、常用指令
1.
git合并到主干:
```
git checkout master
git merge [分支名称]
git push
```
二、运行环境
1.
```
node -v ==> v8.11.3
npm -v ==> 5.6.0
#使用淘宝镜像
npm config set registry https://registry.npm.taobao.org
[npm install -g cnpm --registry=https://registry.npm.taobao.org]
```
三、项目初始化
- 安装vue
npm install vue@^2.5.2 --save 使用脚手架命令行工具vue-cli创建vue项目
最好先初始化项目,再创建一些记录性文件
 #全局安装 vue-cli
 npm install --global vue-cli
 #创建一个基于 webpack 模板的新项目
 vue init webpack qu-na-er  (去哪儿网-GitBash中执行没有反应)

 #输入项目信息
 >> Project name qu-na-er
 >> Project description A Vue.js project
 >> Author dev@jiangjiesheng.cn
 >> Vue build (Use arrow keys)
 >> Vue build standalone
 >> Install vue-router? Yes
 >> Use ESLint to lint your code? Yes
 >> Pick an ESLint preset Standard
 >> Set up unit tests No
 >> Setup e2e tests with Nightwatch? No
 >> Should we run `npm install` for you after the project has been created? (recommended) npm

    vue-cli · Generated "qu-na-er".

 # Installing project dependencies ...
 # ========================

 #安装依赖
 cd qu-na-er
 (这里是单独创建一个文件夹并初始化的,所以把项目复制到原始的创建的项目中)
 npm install
 npm run dev
四、认识项目结构并引入必要文件
reset.css
统一不同浏览器的默认样式,文件为src/assets/styles/reset.css,并在main.js中引用
【本项目使用的尺寸单位是rem,是相对于html的font-size: 50px的大小来设置的】
1rem = html font-size = 50px即
43px = 0.86rem// 统一不同浏览器的默认样式 import './assets/styles/reset.css'- 1像素边框
可以显示一个类似垂直分割线的边框效果,文件为src/assets/styles/border.css,并在main.js中引用
// 1像素边框解决方案 import './assets/styles/border.css' - 300毫秒点击延迟(在部分浏览器上)
安装并在main.js中引入并初始化
npm install fastclick --saveimport fastclick from 'fastclick' // 300毫秒点击延迟 fastclick.attach(document.body) iconfont注册
使用微博登录 jiangjsheng@sina.cn
菜单 >> 图标管理 >> 我的项目
下载后注意修改iconfont.css中的引用路径
五、去哪儿网首页
参考页面 http://piao.qunar.com/touch/
- Header头
    首先安装css插件
```
 npm install stylus --save
 npm install stylus-loader --save
```
stylus使用
```
//scoped 对局部样式有效
<style lang="stylus" scoped>
  .header //不要有冒号
    display: flex
    height: .86rem
    .header-left //不要有冒号
      width: .64rem
      float: left
    .header-input //不要有冒号
      flex: 1
    .header-right //不要有冒号
      width: 1.24rem
      float: right
</style>
```
scoped的样式穿透
```
<style lang="stylus" scoped>
  .wrapper >>> .swiper-pagination-bullet-active
     background: red !important
</style>
```
style中引入注意

 @表示src目录别名

**别名配置在build/webpack.base.conf.js中的alias节点**

注意在style使用要加上~
```
@import '~@/assets/styles/varibles.styl'
```
首页轮播图
首先在线上创建分支index-swiper,分支都相对于前一个分支,然后git pull 同步本地分支,并切换到分支index-swiper
https://www.npmjs.com/package/vue-awesome-swiper
https://github.com/surmon-china/vue-awesome-swiper
https://blog.csdn.net/mrliber/article/details/78819191 [配置参考]
安装
npm install vue-awesome-swiper@2.6.7 --savehtml上的冒号是绑定属性,@是绑定事件
子组件中的属性需要在data() 中定义并返回对象弱网测试:F12 > Network > 选择3G网络
设置轮播图的占位
  .wrapper
     overflow: hidden
     width: 100%
     height:0
     padding-bottom: 25%
or, 但是可能有兼容问题
  .wrapper
     width: 100%
     height:25vw
push代码后切换回master主干,并合并index-swiper分支代码
 git checkout master
 git merge index-swiper
 git push
首页图标菜单组件
创建分支index-icons-3
设置基本占位效果
 <template>
   <div class="icons">
     <div class="icon">
     </div>
   </div>
 </template>

 <script>

 export default {
   name: 'HomeIcons'
 }
 </script>

 <style lang="stylus" scoped>
   .icons
     overflow: hidden
     height: 0
     padding-bottom: 50%
     background: green
     .icon
       float:left
       width:25%
       padding-bottom: 25%
       background: red
 </style>
安装 vue dev tools Chrome浏览器插件,方便查看Vue的结构
Vuejs的计算属性
 computed: { // 计算属性
     pages () {
       const pages = []
       this.iconList.forEach((item, index) => {
         const page = Math.floor(index / 8)
         if (!pages[page]) {
           pages[page] = []
         }
         pages[page].push(item)
       })
       return pages
     }
 }
stylus的样式封装(相当于方法)
 // src/assets/styles/mixins.styl

 ellipsis()
   overflow: hidden
   white-space: nowrap
   text-overflow: ellipsis
 // 应用
 @import '~@/assets/styles/mixins.styl'
 .icon-desc
   height: 0.44rem
   line-height: 0.44rem
   text-align: center
   ellipsis()
首页推荐组件
创建分支index-recommend-4
flex关键作用
 //相当于安卓中的layout_weight:1 ,用于撑开剩余空间部分
 flex:1
如果ellipsis的省略效果不出现,可以在父级设置min-width:0
注意: 子组件中定义的data需要使用return一个对象
 export default {
   name: 'HomeRecommend',
   data () {
     return {
       recommendList: [
         {
           id: '0001',
           imgUrl: 'http://img1.qunarzz.com/sight/p0/201406/04/4f597aad25208a233999238c65af9b06.jpg_200x200_d1ea2bd2.jpg',
           title: '南京珍珠泉水上世界',
           desc: '高品质天然泉水水上乐园'
         }
       ]
     }
   }
 }
使用ajax获取api数据
安装axios依赖
npm install axios --save在首页Home.vue中mounted()生命周期函数(又称钩子函数)中获取整个首页的多个组件API数据。
基本用法
 import axios from 'axios'

 export default {
   name: 'Home',
   components: {
    ...
   },
   methods: {
     getHomeInfo () {
       axios.get('/api/index.json')
         .then(this.getHomeInfoSucc)
     },
     getHomeInfoSucc (res) {
       console.log(res)
     }
   },
   mounted () {
     this.getHomeInfo()
   }
 }
Mock API数据
/config/index.js >> dev >> proxyTable
 proxyTable: {
     '/api': {
         target: 'http://localhost:8080',
         pathRewrite: {
             '^/api':'/static/mock'
         }
     }
 }
另外关于资源和API请求在线上环境需要分离的处理见
《npm-资源路径-本地调试-线上环境的api配置-环境隔离-打包》
首页的父子组件数据传递
 // 父组件

 // 关键位置1 绑定city属性
 <home-header :city="city"></home-header>

 // 关键位置2 在data () 中定义city属性,并更新值
 export default {
   name: 'Home',
   components: {
     ...
   },
   data () {
     return {
       city: ''
     }
   },
   methods: {
     getHomeInfo () {
       axios.get('/api/index.json')
         .then(this.getHomeInfoSucc)
     },
     getHomeInfoSucc (res) {
       res = res.data
       if (res.ret && res.data) {
         const data.city = res.data
         this.city = data.city
       }
     }
   },
   mounted () {
     this.getHomeInfo()
   }
 }

 // 子组件

 // 在props中定义属性并指定类型
 export default {
   name: 'HomeHeader',
   props: {
     city: String
   }
 }

 //取父组件传过来的值
 {{this.city}}
六、去哪儿网选择城市列表页
CityHeader组件
创建分支city-router-6
新增city路由,/src/router/index.js
 {
 path: '/city',
 name: 'City',
 component: City
 }
Header.vue
快速搜索组件
创建分支city-search-7
Search.vue
城市列表组件
创建分支city-list-8
List.vue
修改1像素默认的伪元素的属性
 .border-topbottom
 &:before
   border-color: #ccc
 &:after
   border-color: #ccc
Better-Scroll区域滚动组件
https://github.com/ustbhuangyi/better-scroll
https://blog.csdn.net/qq_26632807/article/details/77856950 [参数设置]
不带参数的better-scroll初始化会导致在安卓手机上不能点击better-scroll区域中的click事件,配置方法见
安装Better-Scroll
npm install better-scroll --saveDOM结构
 <div class="wrapper">
   <ul class="content">
     <li>...</li>
     <li>...</li>
     ...
   </ul>
   <!-- you can put some other DOMs here, -->
   <!-- it won't affect the scrolling -->
 </div>
初始化
1> 最简单的初始化(废弃):
 import BScroll from 'better-scroll'
 const wrapper = document.querySelector('.wrapper')
 const scroll = new BScroll(wrapper)
Better-Scroll提供一个类,当实例化时,其第一个参数是一个纯DOM对象。当然,Better-Scroll内部滚动将尝试使querySelector选择器来获取DOM对象,因此初始化代码也可以如下所示:
2> 带参数的初始化(必须使用)
 import BScroll from 'better-scroll'

 mounted () {
    const options = {
    // 处理在better-scroll在安卓手机上不能点击的问题
    // 更多配置见
    // https://ustbhuangyi.github.io/better-scroll/doc/zh-hans/options.html#click
    click: true,
    tap: true
  }
  this.scroll = new Bscroll(this.$refs.wrapper, options)
},
特别注意要使Better-Scroll生效,可能还需要目标滚动区域要有效果,即默认上下溢出时却不能滚动才可以
 .list
   overflow: hidden
   position: absolute
   top: 1.58rem
   left: 0
   right: 0
   bottom: 0
   background: red
获取DOM节点的方法
 // 指定一个ref (不加s)
 <div class="list" ref="wrapper">

 // 获取dom (不加s)
 this.$refs.wrapper
右侧字母表组件
创建分支city-alphabet-9
Alphabet.vue
flex又一用法
 display: flex
 flex-direction: column
 justify-content: center
特别注意在微信或者QQ浏览器向下滑动会触发事件冒泡,导致不能通过字母表上下滑动选择字母
 <li @touchmove="handleTouchMove">{{item}}</li>

 methods: {
   handleTouchMove (e) {
     // 微信中处理 向上滑动时整个页面跟随滚动的问题
     e.preventDefault()
     ...
   }
 },
ajax获取数据
创建分支 city-ajax-10
兄弟组件间联动
创建分支 city-components-11
基本过程: Alphabet.vue子组件通过$emit发出自定义事件changeLetter
 methods: {
   handleLetterClick (e) {
      this.$emit('changeLetter', e.target.innerText)
     }
 }
City.vue父组件在子组件dom上绑定子组件发出事件的接收函数changeLetter,并通过父组件中的handleLetterChange接收值letter,
 <template>
  <div class="w">
     <city-alphabet @changeLetter="handleLetterChange"></city-alphabet>
   </div>
 </template>
 ...
 data () {
   return {
       letter: ''
     }
   },
 methods: {
   handleLetterChange (letter) {
     this.letter = letter
   }
 },
City.vue父组件再通过给List.vue子组件绑定属性的方式,把值letter传递给子组件
:letter="letter"List.vue子组件通过定义属性的方式接收传递过来的值,并通过来watch监听letter变化。
 props: {
    letter: String
 },
 watch: {
    letter () {
      console.log(this.letter)
    }
 }
城市列表页搜索逻辑处理
创建分支 city-search-logic-12
v-model实现数据的双向绑定
 <input v-model="keyword" class="search-input" type="text" placeholder="输入城市名或拼音">

 data () {
     return {
       keyword: '',
       list: [],
       timer: null
     }
 },
 watch: { // 特别注意:这里冒号不是watch () { ... }
   keyword () {
     if (this.timer){
         clearTimeout(this.timer)
     }
     this.timer = setTimeout(() => {
     const result = []
     for (let i in this.cities) {
       this.cities[i].forEach((value) => {
       if (value.spell.indexOf(this.keyword) > -1 || value.name.indexOf(this.keyword) > -1) {
          result.push(value)
          }
         })
       }
     this.list = result
  },100)
 }
控制Dom是否显示
v-show="!list.length" or better v-show="hasNoData" computed: { hasNoData () { return !this.list.length } },vuex实现数据共享
创建分支city-vuex-13
官网文档 https://vuex.vuejs.org/zh/
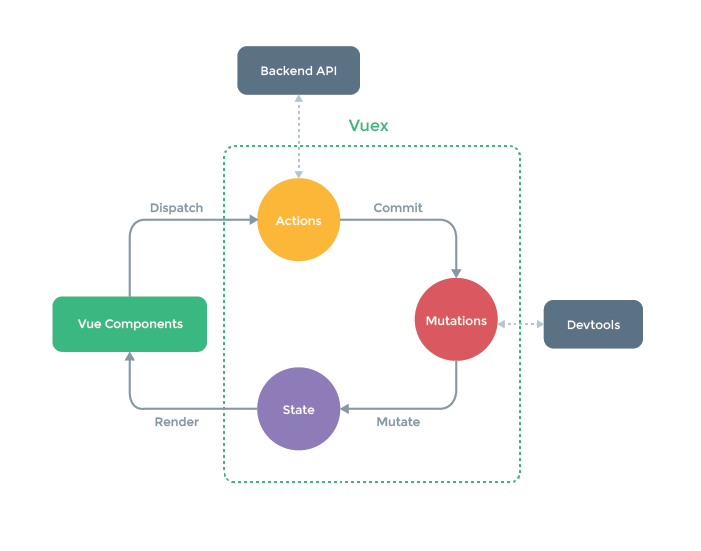
基本使用步骤:
1> 安装vuex
npm install vuex --save2> 新建/src/store/index.js, 并在main.js中引入
 import Vue from 'vue'
 import Vuex from 'vuex'

 Vue.use(Vuex)

 export default new Vuex.Store({
   state: {
     city: '南京'
   }
 })
3> 并在main.js中引入,注册在Vue实例中
 import store from './store/'

 new Vue({
   el: '#app',
   router,
   store, // 看我看我
   components: { App },
   template: '<App/>'
 })
4> 取值
{{this.$store.state.city}}5> 给热门城市绑定点击事件,并在点击事件中分发存储事件通知,在/src/store/index.js接收事件,并继续处理数据更新。
也可以直接跳过dispatch,直接修改commit,即
 // this.$store.dispatch('changeCity', city)
 this.$store.commit('toChangeCity', city)
<div v-for="item of hot" :key="item.id" @click="handleCityClick(item.name)"> methods: { handleCityClick (city) { this.$store.dispatch('changeCity', city) alert(city) } }, /src/store/index.js export default new Vuex.Store({ state: { city: '南京' }, actions: { //看我看我 changeCity (ctx, city) { console.log(city) ctx.commit('toChangeCity', city) } }, mutations: { toChangeCity (state, city) { state.city = city } } })vuex还支持字段映射
 import { mapState } from 'vuex'

 computed: {
   ...mapState(['city'])
 }
or
 import { mapMutations } from 'vuex'

  handleCityClick (city) {
   ...
   this.toChangeCity(city)
 },
 ...mapMutations(['toChangeCity'])
通过js来打开路由页面
this.$router.push('/')使用keep-alive优化性能
创建分支 city-keepalive-14
修改App.vue
 <template>
   <div id="app">
     <keep-alive> // 看我看我
       <router-view/>
     </keep-alive>
   </div>
 </template>
此时又需要处理数据动态改变时页面需要重新请求数据,例如当前城市改变时,需求加载当前城市的信息
使用keep-alive后,mounted周期函数只会被调用一次,但是activated周期函数会每次都会被调用。所以...
在Home.vue中使用vuex,并在computed计算属性中映射一个city对象,同时定义一个属性lastCity标记上一个城市。
然后在activated周期函数中判断当前选择城市和上一个城市是否相等,不相等则将当前城市作为参数重新请求一次ajax。
 import { mapState } from 'vuex'

 data () {
   return {
     lastCity: '',
    }
 },
 computed: {
   ...mapState(['city'])
 },
 methods: {
   getHomeInfo () {
      axios.get('/api/index.json?city=' + this.city)
         .then(this.getHomeInfoSucc)
     }
 },
 mounted () { // 页面初始化
   this.lastCity = this.city
   console.log('mounted')
   this.getHomeInfo()
 },
 activated () { // 页面可见时
   if (this.lastCity !== this.city) {
     this.lastCity = this.city
     this.getHomeInfo()
   }
    console.log('activated')
 }
另外也可以使用来排除一部分页面,使其不使用缓存,例如城市详情页,修改App.vue
 <keep-alive exclude="Detail">
   <router-view/>
 </keep-alive>
特别注意: exclude会导致页面中不再回调activated (), 但是会调用created (),所以一些需要重新初始化的方法或者属性需要在created () 调用。
例如:src/pages/detail/components/Header.vue
七、城市详情页面
- Banner
创建分支detail-banner-15

将li标签换成router-link:

> 解决router-link默认会改成标签颜色问题

注意需要同时在router-link标签上增加tag属性,指定需要渲染成li标签,同时指定to属性。

```
<router-link tag="li" v-for="item of list" :key="item.id" :to="'/detail/' + item.id">
  ...
</router-link>
```

注册动态路由,获取路由参数

```
 {
  path: '/detail/:id',
  name: 'Detail',
  component: Detail
 }
```

参考 http://touch.piao.qunar.com/touch/detail.htm?id=33782

创建DetailBanner组件

渐变效果
```
background-image: linear-gradient(top, rgba(0, 0, 0, 0), rgba(0, 0, 0, 0.8))
```
共用组件画廊
swiper 中文网
http://3.swiper.com.cn/api/pagination/2016/0126/299.html
代码见 /src/common/gallary/Gallary.vue
Header渐隐渐显效果
创建分支 detail-header-16
特别注意:获取滚动条滚动的垂直距离scrollTop的兼容问题
通过绑定:style的opacity属性来动态改变透明度
<router-link tag="div" to="/" class="header-abs" v-show="showAbs" :style="opacityAbsStyle"> <div class="iconfont back-icon-back"></div> </router-link> <div class="header-fixed" v-show="!showAbs" :style="opacityFixedStyle"> <router-link to="/"> <div class="iconfont header-fixed-back"></div> </router-link> 景点详情 </div>data () { return { showAbs: true, opacityAbsStyle: { // 返回键的渐变 opacity: 1 }, opacityFixedStyle: { // 固定标题栏的渐变 opacity: 0 } } }, methods: { handleScroll () { // 特别注意,scrollTop中的每一对()都是来自网络的一种取法。已兼容安卓浏览器和UA为苹果的浏览器 const scrollTop = (window.parent.document.documentElement.scrollTop || window.parent.document.body.scrollTop) || (document.body.scrollTop + document.documentElement.scrollTop) || (window.pageYOffset || document.documentElement.scrollTop || document.body.scrollTop || 0) if (top > 40) { // 固定标题栏的渐变 let opacity = top / 130 opacity = opacity > 1 ? 1 : opacity this.opacityFixedStyle = { opacity } this.showAbs = false } else { // 返回键的渐变 this.showAbs = true let opacity = top / 40 opacity = opacity > 1 ? 1 : opacity this.opacityAbsStyle = { opacity: (1 - opacity) } } } }, activated () { window.addEventListener('scroll', this.handleScroll) }对全局事件解绑
处理上一节window.addEventListener
 activated () {
     window.addEventListener('scroll', this.handleScroll)
 }
解绑事件:
 deactivated () {
   window.removeEventListener('scroll', this.handleScroll)
 }
使用递归组件实现详情页列表
创建分支 detail-list-17
json数据
 list: [{
     title: '成人票',
     children: [{
       title: '成人三管联票',
       children: [{
         title: '成人三管联票 - 某一连锁店销售'
       }]
     }, {
       title: '成人五管联票'
     }]
   }, {
     title: '学生票'
   }, {
     title: '儿童票'
   }, {
     title: '特惠票'
   }]
递归调用detail-list组件(List.vue)
 <div>
   <div class="item" v-for="(item,index) of list" :key="index">
     <div class="item-title border-bottom">
      <span class="item-title-icon"></span>
          {{item.title}}
     </div>

     // 看这里
     <div v-if="item.children" class="item-children">
           <detail-list :list="item.children"></detail-list>
     </div>
    </div>
 </div>
ajax获取数据
创建分支 detail-ajax-18
注意一下,使用属性绑定时加上冒号
<img class="banner-img" :src="bannerImg">显示文本,使用{{属性xxx}}即可
 <div class="banner-title">{{this.sightName}}</div>
 // 这里的this可以去掉,但是大部分js环境的this不能去
使用计算属性控制是否显示一个列表部分(避免按空数组初始化,导致有数据变化时的当前显示的索引为列表的最后一个)
 <swiper :options="swiperOption" v-if="isShowGallary">
  // 需要特别注意,这个不要使用v-show,而是v-if
    ···
 </swiper>

 computed: {
  isShowGallary () {
    return this.imgs.length > 0
  }
 }
路由行为
打开新页面显示到顶部,不能受到上一页上下滚动的距离影响
https://cn.vuejs.org/v2/guide/migration-vue-router.html#saveScrollPosition-替换
修改router/index.js
 export default new Router({
 routes: [{
     path: '/',
     name: 'HelloWorld',
     component: Home
   }], // 打开新页面显示到顶部,不能受到上一页上下滚动的距离影响
   scrollBehavior: function (to, from, savedPosition) {
     return savedPosition || { x: 0, y: 0 }
   }
 })
更多关于路由介绍
在项目中使用基本动画
创建分支 detail-animation-19
代码在src/common/fade/FadeAnimation.vue (淡入淡出效果)
 <template>
   <transition>
     <!-- 插槽 调用方的包裹的子组件会填充到这里 -->
     <slot></slot>
   </transition>
 </template>

 <script>

 export default {
   name: 'FadeAnimation'
 }
 </script>

 <style lang="stylus" scoped>
   .v-enter, .v-leave-to
     opacity: 0
   .v-enter-active, .v-leave-active
     transition: opacity .5s
 </style>
应用在在src/pages/detail/components/Banner.vue中
  <fade-animation>
   <!-- 这里会填充到插槽 -->
   <common-gallary :imgs="bannerImgs" v-show="showGallary"></common-gallary>
 </fade-animation>